Records
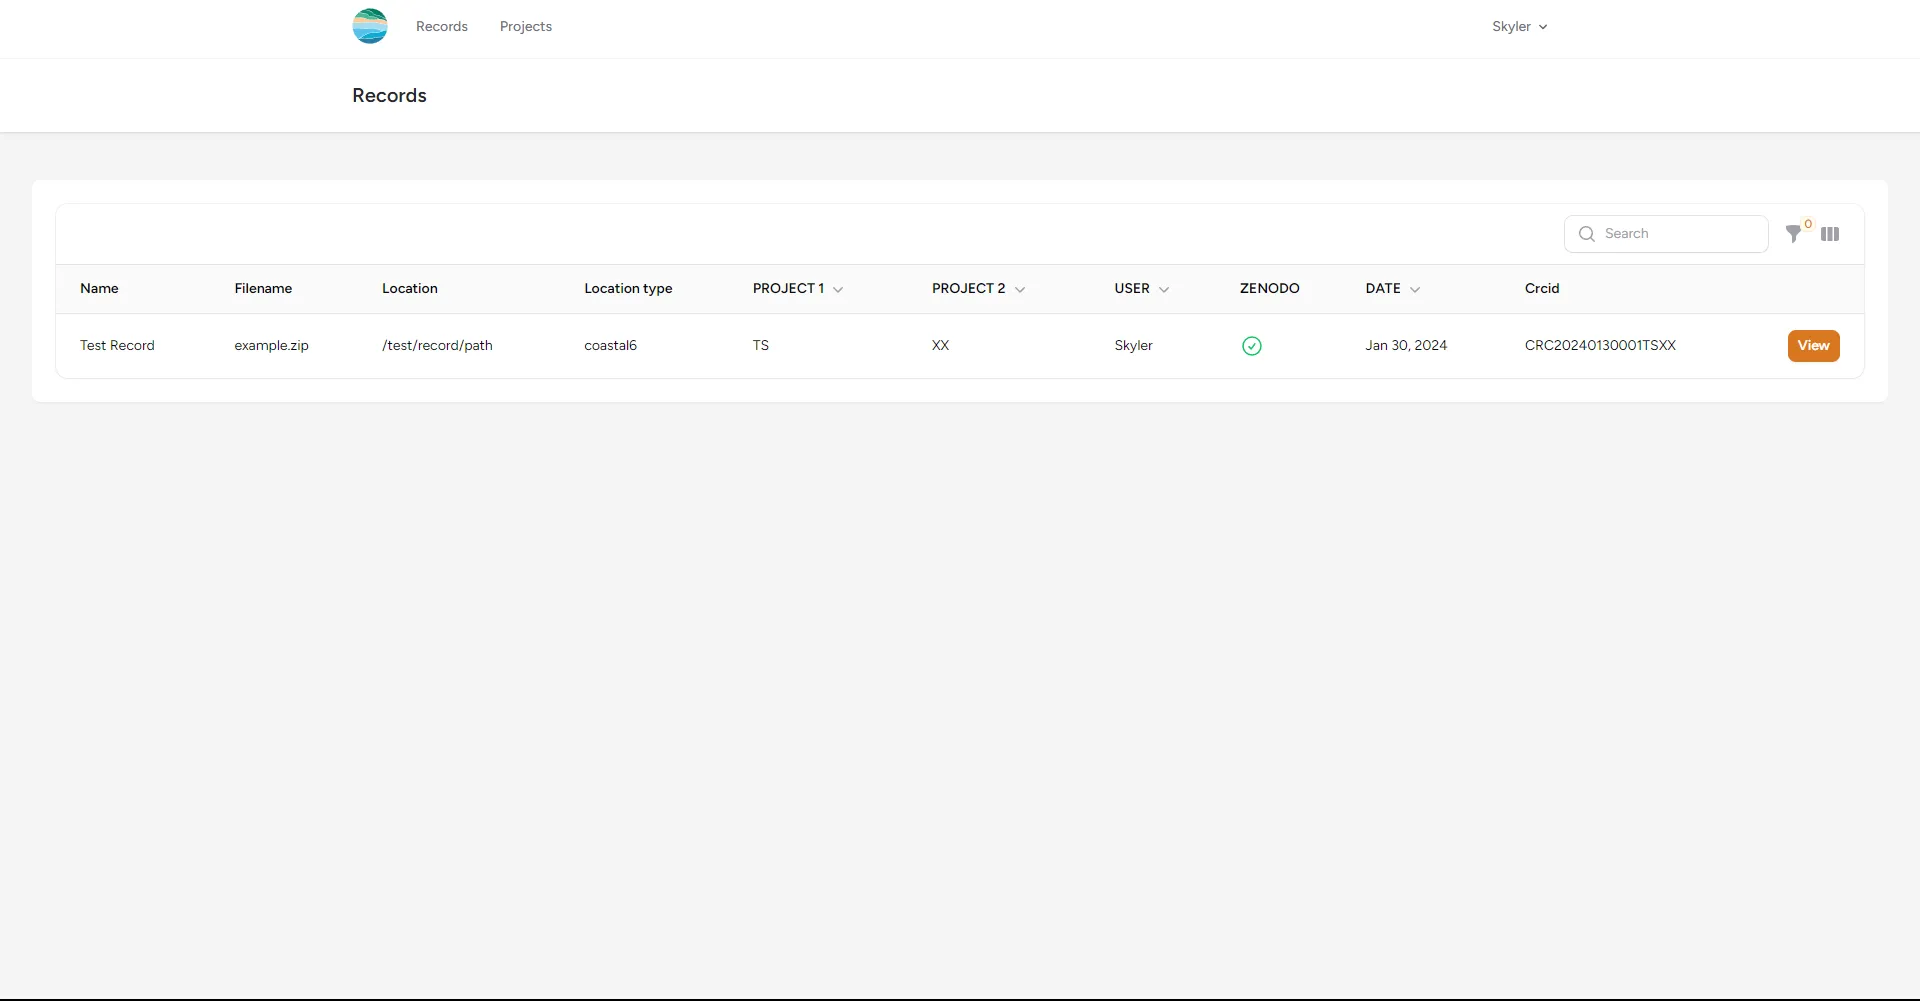
Field Definitions
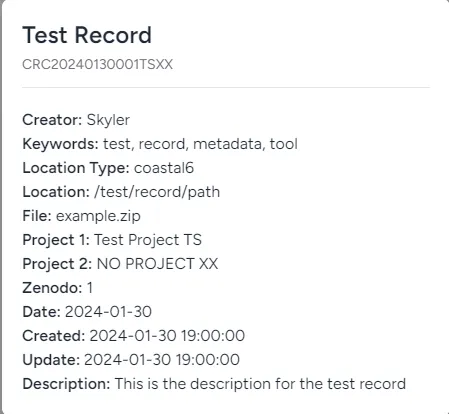
- Record Name: Name of the record related to the dataset
- CRCID: A unique identifier that will be utilized to keep track of CRC associated data
- Ex. CRC20231024001GDTS
- Format of the CRCID: CRCYYYYMMDD000XXYY
- CRC: Identifies that this ID is associated to CRC
- YYYY: Year that the record for the data has been created
- MM: Month that the record for the data has been created
- DD: Date that the record for the data has been created
- 000: ID of the record stored within the database that increments each time a record is created
- XX: Primary Project Code
- YY: Secondary Project Code
- Creator: Name of user who curated the record
- Keywords: Keywords that are related to the dataset
- Location Type: The location medium type that the dataset has been stored
- Location: The location path where the dataset file is stored
- File: Name of the file for the dataset
- Project 1: The primary project that the dataset is associated with (List of projects on project page)
- Project 2: The secondary project that the dataset is associated with (List of projects on project page)
- Zenodo: Is the data stored in Zenodo or will it be uploaded to Zenodo in the future?
- Date: Date associated with the dataset
- Created: Date and time record has been curated into the Metadata Tool
- Updated: Date and time record has been updated in the Metadata Tool
- Description: Additional metadata for the dataset name and description to further identify what the dataset means
Note: You can query the records based on the fields above. You can checkout the record querying guide over here
All fields for this form requires an entry. If there is ambiguity within the description of the field, please email skyler8@hawaii.edu, but for now you can just enter
a temporary placeholder for now and edit it with the actual information later.
How to Curate Record in Metadata Tool?
1. In the navigation bar, click on Records

2. In the dropdown, click on Create Record

3. Type in name that is associated with the dataset

- IMPORTANT To ensure efficient organization of your dataset, it is essential to compress multiple files associated with a single dataset before uploading. Please use common compression formats like .zip or .tar.gz (tarball).
- Exmample: Compressing files associated with a Shapefile
- Compress shapefile with auxilary and metadata files needed to read/access the shapefile (CPG, DBF, PRJ, LOCK, SHX)
- You do not need to compress a dataset if it is only a single file
4. Type a description of the dataset

- The description will hold additional metadata to hold more information about the dataset. Please enter a couple of sentences about the dataset.
5. Type in keywords to describe the subject/topic of the dataset

6. (If applicable) Select a date associated with the dataset

- If there is no explicit date that is associated with the dataset or if the date is unknown, please select the date of the record creation.
7. Select a Primary Project for the dataset

- The project 1 dropdown will be populated by the projects that you are assigned
- To see the list of all projects, you can view the projects here
- If you need to access to another project, please email skyler8@hawaii.edu or mbarbee@hawaii.edu
- Dataset needs to have at least one associated project. If there’s not a specific project associated to the dataset, choose General Data.
8. Select a Secondary Project for dataset

- The project 2 dropdown will be also populated by the projects that you are assigned
- Please be sure to select a different project from project 1, or this field will default to a blank “N/A” project
- Data may be associated to two project. If not, please leave project 2 as the first option “Pick one” this will default to a blank “N/A” project
9. Select a Location Type (Preferably KoaCloud)

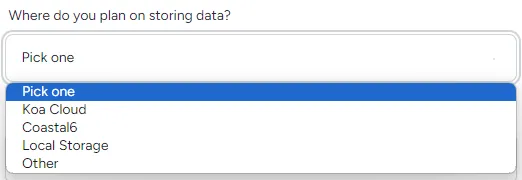 Note: This field is only a note for the location of your dataset that will be stored in a database. It is preferrable to store data on KoaCloud and keep any copy or backup in local storage and/or coastal6 (More backups the better)
- KoaCloud
- Storing data
- Coastal6
- Storing datasets on coastal6 network drive is a good temporary storage medium for sharing big files. Storing datasets in CRC network drive, coastal6, requires user to be connected to the SOEST network.
- Locally Stored
- Locally storing datasets includes storing on computer hard drive, external hard drive, or USB drive. Anything that doesn’t require network access.
- Other
- Other storage methods includes, but not limited to Google Drive, FTP, imina, and koa long term storage.
- Any online storage
10. Type in the location path for the dataset

- For each storage medium, type in the FULL location of the dataset in a readable format. Below are examples of the format depending on the storage medium
- Coastal6/KoaCloud
- Format: /Data/example/
- Other/Local Storage
- Format: Device-Name:/path-name/
- skyler-laptop:/home/skyler/
- Google-Drive:/Data/Example/
- koa:/Shared-Storage/skyler/
- imina.soest.hawaii.edu:/htdocs/
- Format: Device-Name:/path-name/
- Note: Type out explicitly the device name to fully describe where the dataset is stored. This information will help you and other identify where the datasets are stored.
12. Check Do you plan on uploading to Zenodo?

- Check yes if…
- The dataset is already published on Zenodo
- You plan on publishing on to Zenodo
- Don’t check yes if…
- The dataset will not be published on Zenodo
13. Click on SUBMIT

- When information in the form is ready to be submitted, click the submit button.
- Make sure all of the fields are filled out with information. Otherwise, you will not be able to submit the form
- Red text will appear underneath the field if there are any issues with the inputs after submitting
- Contact skyler8@hawaii.edu if you have any questions
Created with Tango.us